Austrians attack April 11th.
French attack April 12th.
Napoleon Bonaparte's Army of Italy crosses the Alps to the plains of Piedmont.
The Austrian Habsburgs were the main continental opponents of the French. The Austrians and Sardinian Monarchy which controlled Piedmont were allies. Very uneasy allies.
Austrian possessions in Italy included Lombardy centered around Milan, the Duchy of Mantua, and the Alpine region around Trent leading to the Tyrol and Austria proper.
Piedmont forms the western part of the Italian plain formed by the river Po between the Alps and the Appenine. It dominates the crossings from France over the Alps.
Piedmont alone was too small to defy France. Austria found Piedmont a useful shield against French threats to their Italian possessions. They were both monarchies and naturally at odds with the militantly republican French.
Piedmont and Austria did not trust each other. Piedmont felt it was being used by the Austrians. It had lost valuable possessions on the French side of the Alps. It was carrying a likely unsustainable and disproportionate to its size part of the burden of defense against the French. The Austrians for their part knew the Piedmontese were wavering and did not trust them to stay the course.
The Piedmontese were, in fact, likely to fold under significant pressure. The Austrian general Beaulieu was warned of this by his superiors and specifically told not to trust them. He was instructed to seize key Piedmontese fortresses if they attempted to leave the Alliance. Before the battle even began the Austrians were holding back troops to this end, not sharing information, and only relunctantly co-operating with the Piedmontese in the field.
Bonaparte's goal of separating the Piedmontese and Austrians from each other was half acheived before the fighting even began.
Bonaparte had his own political masters to worry about. He, however, managed a policy of placating them with loot, rhetoric, and veiled threats. He'd saved their political skins with his "whiff of grapeshot" and had written his military instructions himself. Their direct instructions not to treat directly with Piedmont politicians he ignored.
A Map showing the routes over the Mountains available to the French.
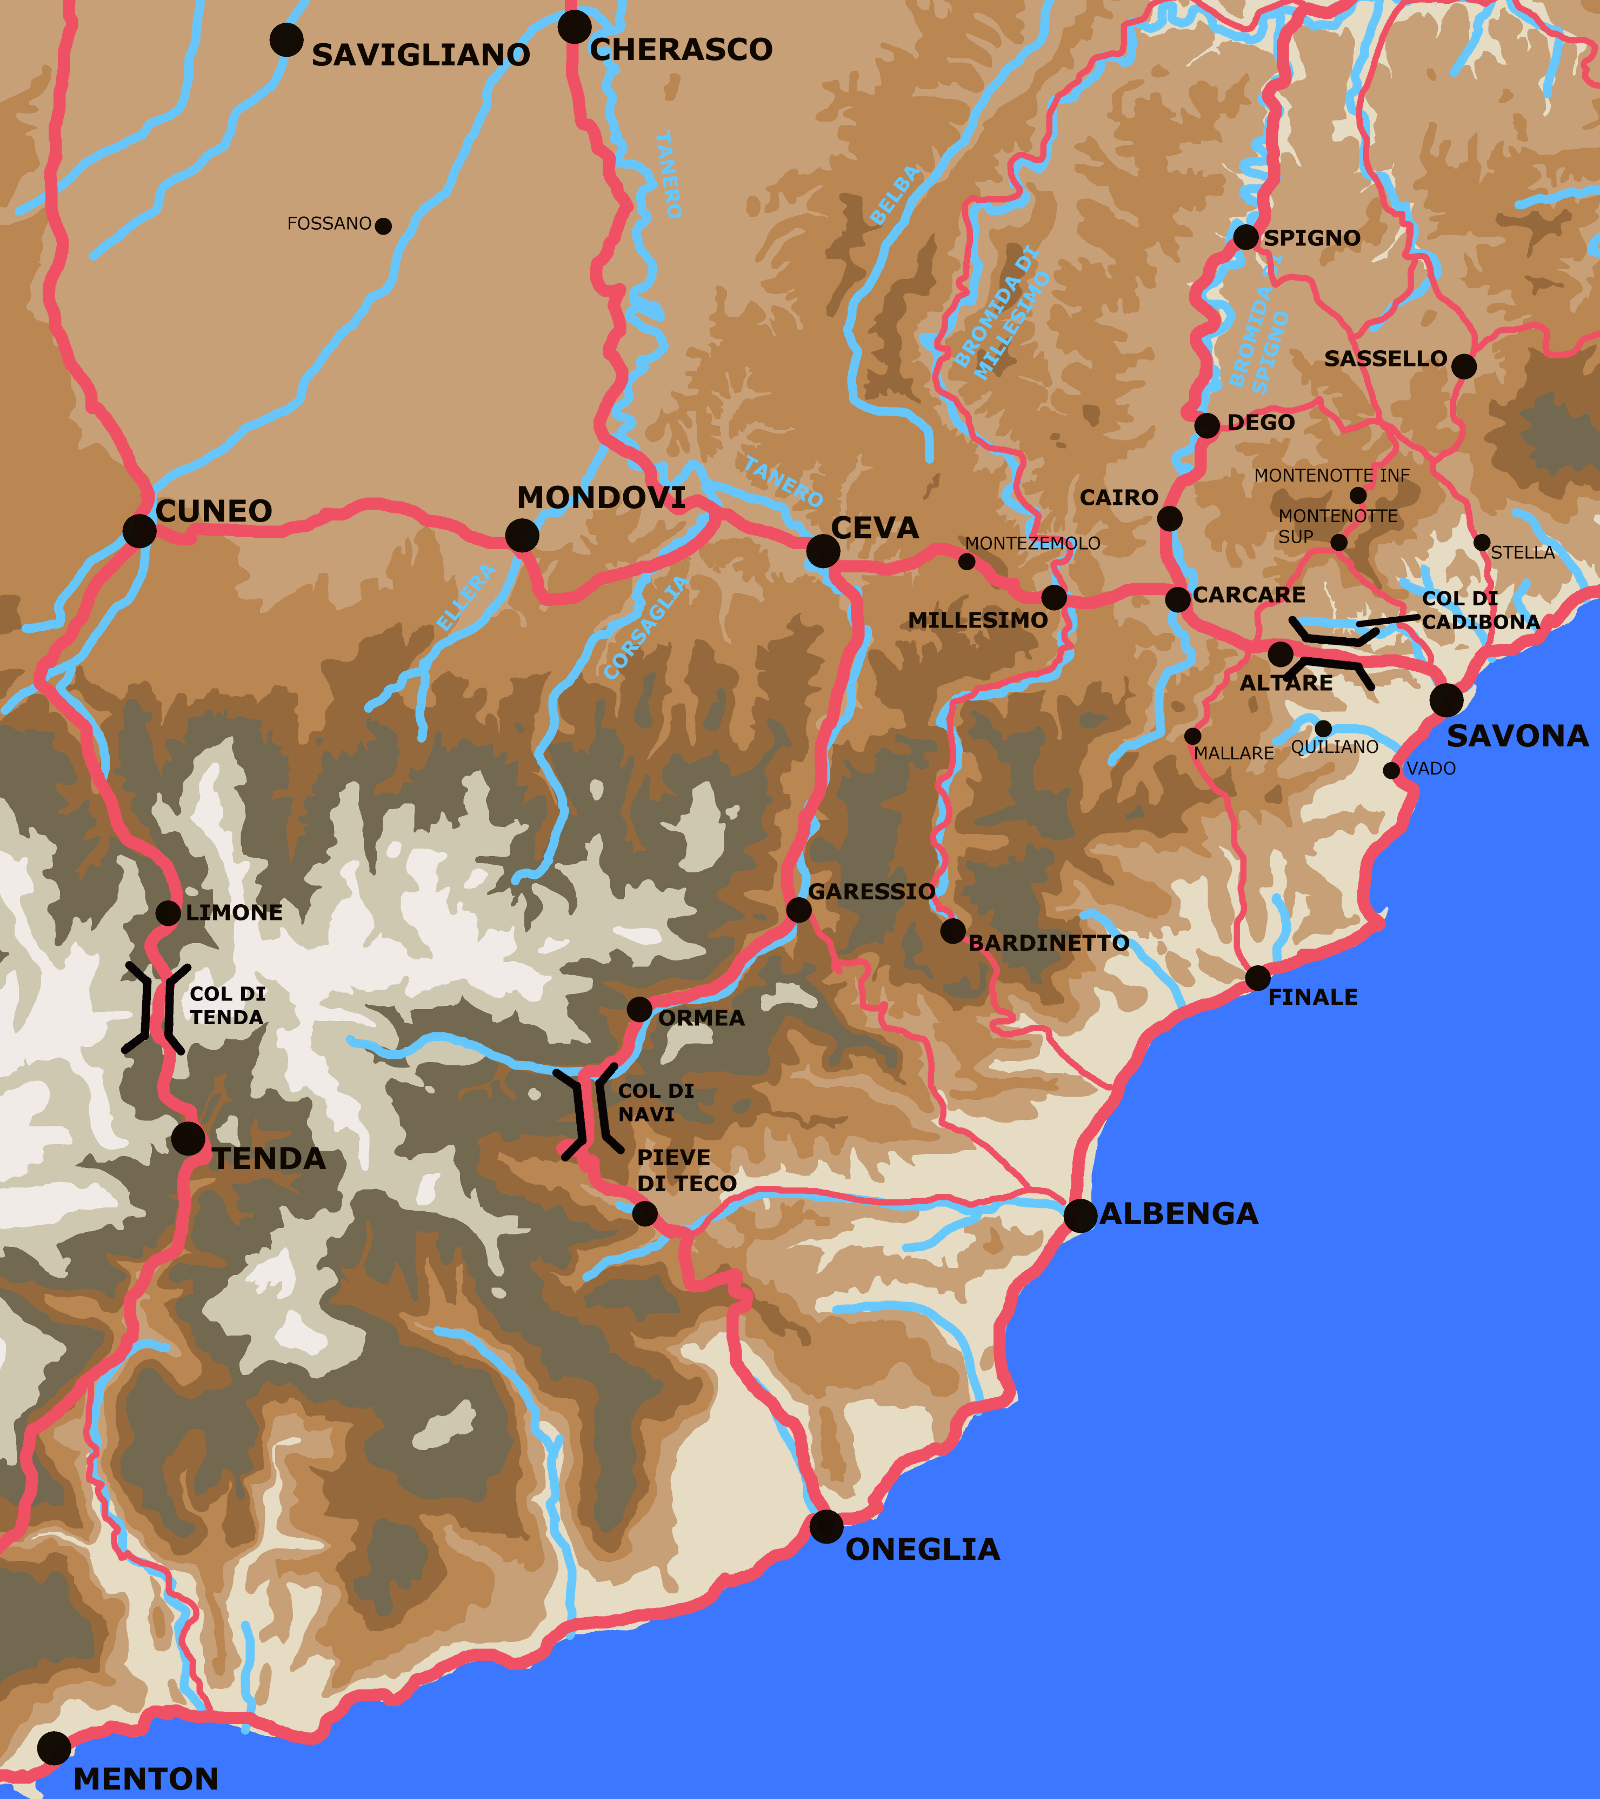
The Maritime Alps and the Appenines meet in this area. Specifically at the Col di Cadibona near Savona. There were six major passes; Col di Tenda, Col di Navi, Col di Cadibona, Col di Govio, the Turchino pass, and the Bochetta pass. The Turchino pass north of Voltri and the Bochetta pass north of Genoa are off map. The Col di Govio between Sassello and Stella on the road between Lombardy and Savona ran north to south and led to the Austrian possessions. As Bonaparte's goal was to knock Piedmont out of the war it was not of interest to him and is not marked on the map.
The three routes of interest are those through the Col di Tenda, the Col di Navi and the Col di Cadibona.
The route through the Col di Tenda from to Nice to Cuneo was the most direct. It was also the highest and only open part of the year. Not only was it easily defensible but Cuneo was a major fortress.
The route through the Col di Navi from Oneglia to Ceva was Piedmont's main link to the sea. Oneglia being Piedmont's sole seaport. It was long, rough, defensible and Ceva was again a major fortress.
The route through the Col di Cadibona from Savona to Ceva was the lowest of the three, and open to the use of carridges, wagons, and cannons all year long. At Carcare a major road branched off north along the course of the Bromida di Spigno. That this route ran east to west distiguished it from most others in the area both major and minor which tended to run north to south. It had the disadvantage of starting at Savona a long ways east from Nice along the vulnerable coastal road.
Bonaparte's political strength back in Paris allowed him to improve the supply situation of the Army of Italy somewhat. Back pay was issued, as were shoes and muskets. Regular rations including meat and brandy as well as bread began to appear. Morale improved significantly. Just the same years of deprivation in a harsh climate (most of the French troops were in the mountains not on the Riveria) meant nominal strengths and effective ones were far apart. Almost half of the French troops were on the sick rolls. Generally they did not recover. Additionally given the existance of raiders from both the local opposition and the British fleet offshore, and because of their own need to disperse to live off of the land, the French forces were spread about in penny packets. It is almost impossible to determine the exact numbers of men available for field operations.
The French Forces available for field operations.
This over simplifies in that Messena's Advance Guard tended to come under Bonaparte's direct command after the initial operations and Massena tended to then take direct charge of field operations usually employing Meynier's division or parts of it. Indeed through out the initial operations brigades tended to be deployed independantly.
In addition to the above Bonaparte had the divisions of Grenier (3,100 men) and Macquard (3,700) guarding Alpine passes, and the cavalry division under Stengal (4,900 sabres) which became usable once he'd penetrated to the plains of Piedmont.
Messena's Advance Guard started between Vado and Voltri, but was mostly concentrated around Savona. Augereau was in the Finale area a little south of that. Serurier was somewhat isolated on the Oneglia to Ceva route, mostly north of the Col di Navi. Bonaparte had established significant supply depots in the this area at Pieve di Teco, Ormea, Garessio, and Berdinetto.
Also note that although Generals of Brigade, often did command more or less permenant collections of demi-brigades (the politically correct French Republican term for "regiment"), that there were numbers of "floating" officers who could be assigned collections of troops for particular tasks. Also campaigns were often very hard on officers as well as enlisted men and officers (e.g. Meynier) would not infrequently need to be replaced temporarily, if not permenantly, because of injury or illness.
Note:(*) Bouvier on page 6 has Beyrand replacing Rusca, his narrative (page 275 and pages 327 to 334) makes it more likely he took over the command of Banel's brigade after Banel was killed at Cossario.
The Sardinian forces under Colli and the Austrian ones under Beaulieu had different bases, different lines of communications, and different goals.
The Austrian line of communications stretched back north through Acqui and Alessandria to Lombardy, to a considerable extent they were still dispersed along that line when the campaign began.
The Sardinian line of communication stretched back northwest to Turin via Ceva and Cherasco. They'd wintered in the Savigliano area and then moved south to the Cuneo (aka Coni) and Ceva area where they could meet threats from all directions and still be in good supply. The Sardinians in addition to major fortresses at Cuneo and Ceva, had a major supply depot at Mondovi.
Linking the Sardinians around Ceva and the Austrians around Acqui mostly was a thin corden of detached battalions (companies even). The first link was a small Austrian Provisional Corps led by Provera, but under the Sardinian command.
It should be noted that any attempt to assign the Austrian forces to brigades, divisions or corps is essentially an exercise in fiction. The Austrians were still an 18th century army. They had a pool of battalions and squadrons and they divided them up among their pool of available generals willy-nilly as circumstances seemed to dictate. A kind of Task Force organization, except in the 18th century task forces tended to be called "columns", or "advance guards", "rear guards" or "main forces". What they didn't have was well established staffs or the tradition of keeping sub-units together so that they could learn to work together and trust each other.
The Austrian Forces began divided roughly as follows:
Beaulieu's nominal strength was 35 battalions and 32 squadrons which would correspond to 32,000 infantry, 5,000 cavalry, and 148 guns.
Reliable sources give Beaulieu between 20,000 and 28,000 men, but as can be seen either because the effective strength of his units were less, or because many of those units were not yet available in the area, he had far fewer available for the actual fight. Worse many (those under Beaulieu's direct command) were out of position north of Voltri and Genoa, more about that shortly.
The Piedmontese under Colli were much more concentrated in the Mondovi-Ceva area.
Prior to Bonaparte taking over the Army of Italy at the end of March its leaders had some of their own ideas. For one they were trying to extort cash and grain out of Genoa. For another someone in Paris (not Bonaparte for a change) instructed Scherer, Bonaparte's predecessor, to attack the Austrians (as opposed to the Sardinians). This attack to be via Acqui and Gavi (at the north end of the Bochetta pass) and towards the Milanese.
A brigade of Massena's had got as far as Voltri the south end of the Turchino pass before Saliceti the political representive to the army, hearing of Bonaparte's eminent arrival, directed Massena to postpone a further advance. This on or about the 24th of March. Bonaparte when he first heard of this advance towards Genoa was quite upset. He hadn't wished to do anything that might prod the Austrians to action. This was on the 28th of March. By April the 4th he seemed to be coming to the opinion that it was a useful diversion. In fact Beaulieu's reaction to the French move was to leave him completely ill prepared to deal with Bonaparte's actual plan.
Convinced the French were moving on Genoa Beaulieu moved to forstall them. He advanced in two columns through the Bochetta and Turchino passes. The column under Sebbottendorf advanced down the Bochetta pass, that of Pittoni through the Turchino pass. Together on April the 10th they pushed Cervoni's brigade, part of Massena's Advance Guard, out of Voltri. Beaulieu was quite pleased with his victory. Bonaparte was not at all concerned.
A map showing the road from Savona to Ceva.
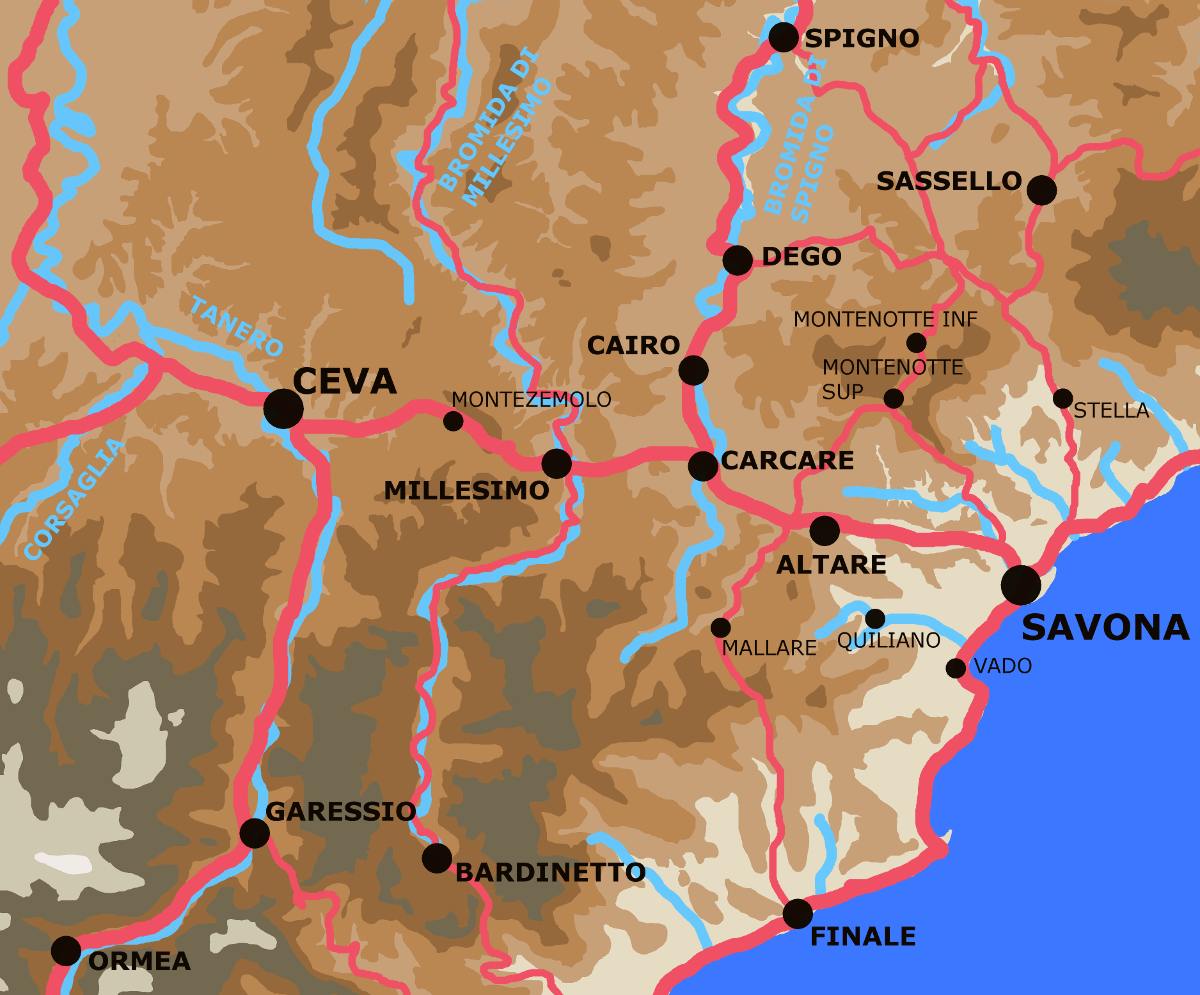
Bonaparte expected he'd need to beseige Ceva a frontier fortress on the river Tanero. To that end he'd gathered thirty-six (36) cannon. Most of the routes available (trails, foot paths, and mule tracks more than roads) were difficult enough for men on foot let alone for cannons. The only year round route, and the one over the lowest pass, was that from Savona to Ceva via the Col di Cadibona pass. Another advantage of this pass was that it ran east to west intersecting a number of the more numerous north to south routes. This meant Bonaparte could attack key positions at Altare, Carcare, Millesimo and Ceva from two directions. Forces capable of stalling his advance from the east, could be flanked from the south. First Augereau then Serurier filled this role. This was a key reason Colli was to give up his otherwise strong position at Ceva. Additionally this enabled Bonaparte to shorten his supply lines as he advanced, first shortening them to pass through the Col di Navi and then the Col di Tenda.
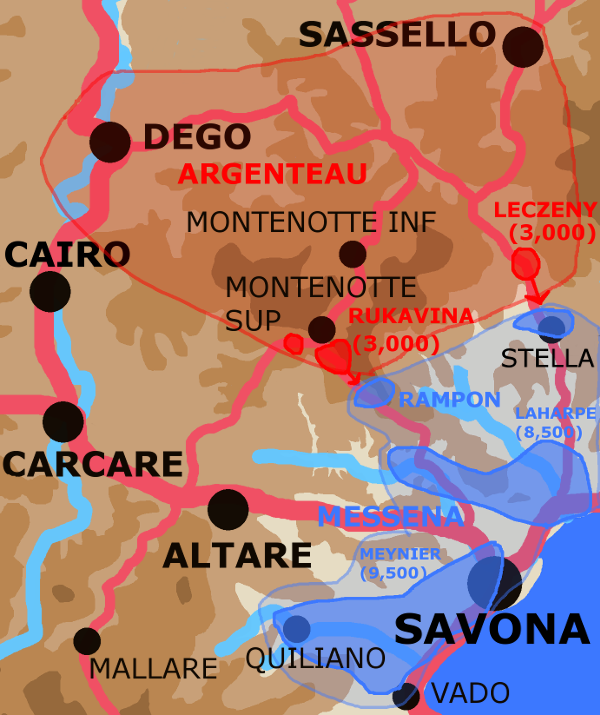
Austrians attack April 11th. |
French attack April 12th. |
See the battles page entry for Montenotte for more details.
Carcare on the Bromida di Spigno was on the good road from Savona to Ceva, it was also the southern terminus of a good road that ran north down the valley of the Bromida di Spigno through Cairo, Dego, Spigno, and on to the Austrian bases at Acqui and Alessandria. This north-south road was the main line of communications for the Austrians in the region. Carcare was the next step after securing Savona from attack and taking the Col di Cadibona and its western end at Altare.
Carcare was entered on the afternoon of April the 12th by the 11th Light of Meynier's division.
Augereau's orders for April the 13th were to "advance at the break of day with his two demi-brigades and his artillery, via Millisimo, Roccavignale and Montezemolo". Augereau was starting at Carcare.
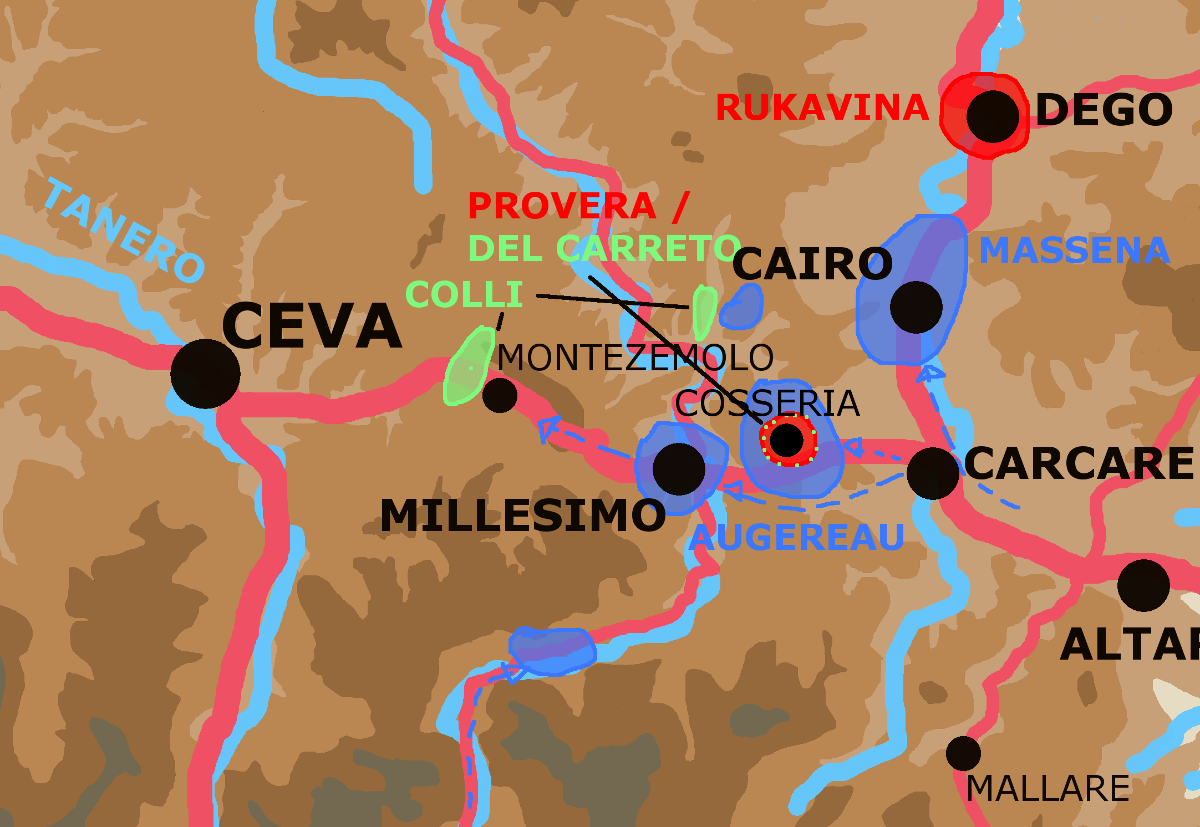
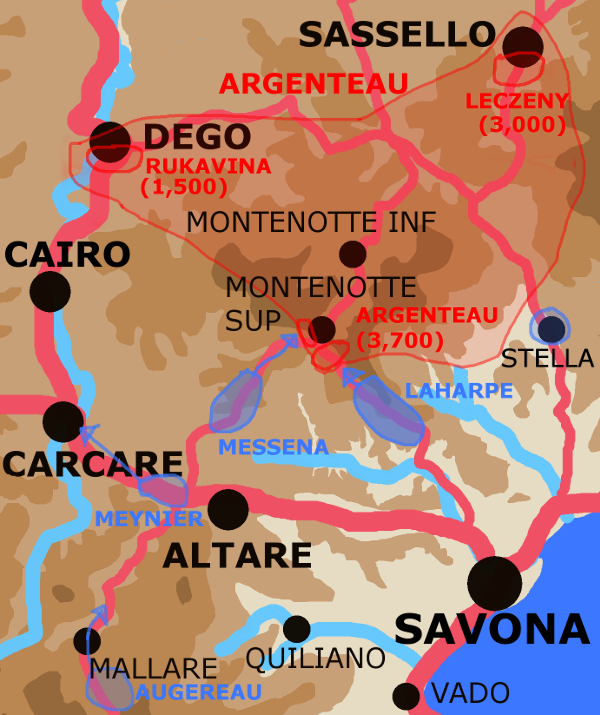
See the battles page entry for Millesimo for more detail.
In the event Augereau encountered both Austrian and Sardinian forces some of whom (about 800 men) holed up in the ruins of the castle at Cossario (mislabeled Cosseria on the map) about three quarters of the way from Carcare to Millesimo. This castle is on a height of land overlooking route 28 just west of the village of Cossario. Augereau's main force got hung up trying to take the castle from the Allies taking major casualties. He did manage to slip Menard's demi-brigade past into Millesimo. Colli with at most a couple of thousand men watched from the heights of Montezemolo not daring to intervene. Despite their good position and brave resistence the Allies at Cossario had no supplies and surrendered early on the morning of the 14th.
The fight at Cossario had cost the French. It had also been discouraging, they knew they were on a tight schedule and did not have the supplies to maintain their men in the mountains for a great amount of time. In retrospect it appears as barely a blip in Bonaparte's triumphal progress. This is at least partly because Bonaparte was at pains to minimize the setback in the official record. Bonaparte was not unique in his attempts to mold perceptions to his advantage, but he played the game with greater vigor and often greater skill than other French generals.
The events at Dego on the 14th and 15th of April are another example of matters not going according to French plans. They suffered from a scary degree of indiscipline consequent on habitually poor to non-existant supplies.
French attack April 14th. 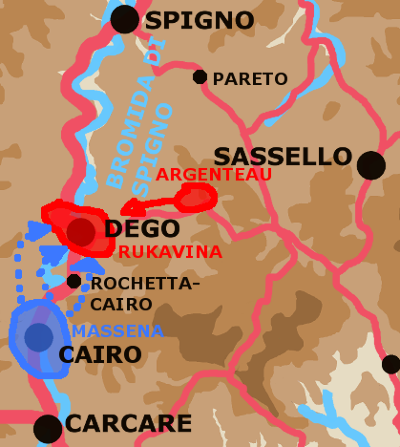 |
Austrian counter-attack by Vukassovitch early on April 15th. 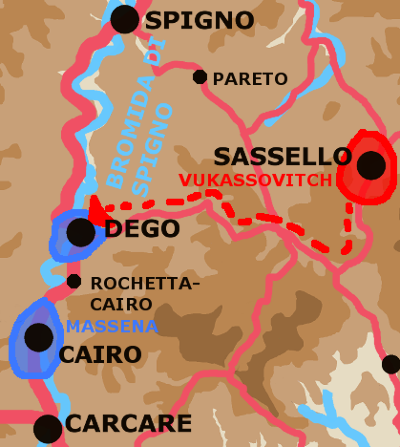 |
French under Massena retake Dego on afternoon of April 15th.  |
Having taken Dego on the 14th the French forces dispersed to loot. Having done so they passed out for the night neglecting to set sentries. Vukassovitch with a late reinforcement arrived on scene early on the 15th and retook the town. Being badly outnumbered he was unable to hold it against the French counter-attack led by Massena.
See the battles page entry for Dego for more details.
Ceva was a strong fortress with outlying defenses stretching along a ridge to the north east.
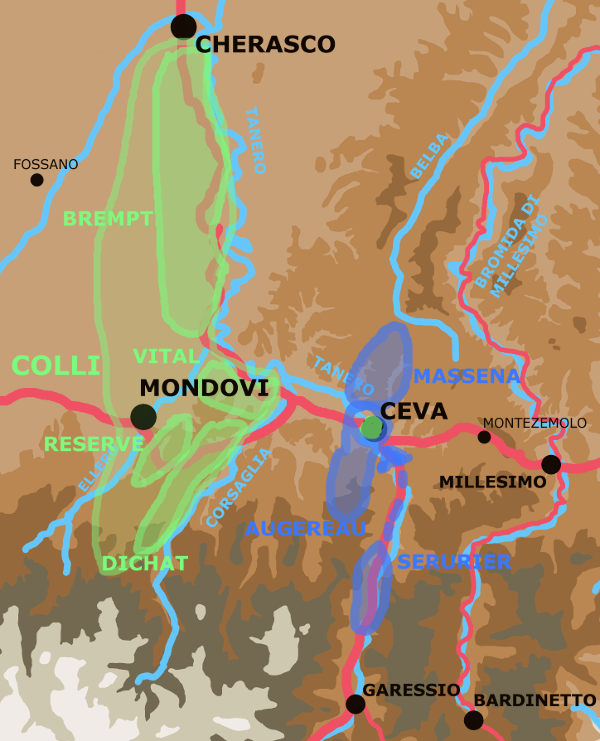
Ceva area on April 16th, Colli is formed up.
Augereau marchs from the Millesimo area on April 16th and attempts to take the Ceva defenses by storm dividing into multiple columns to do so. His attacks fail.
Note that LaHarpe's division is off map to the rear around Sassello north of the French supply lines protecting them from the Austrians.
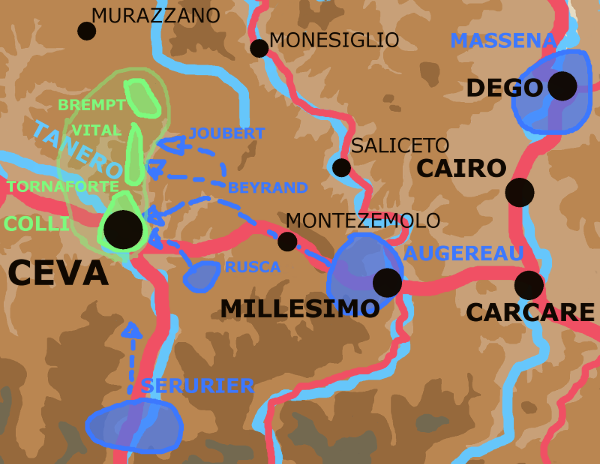
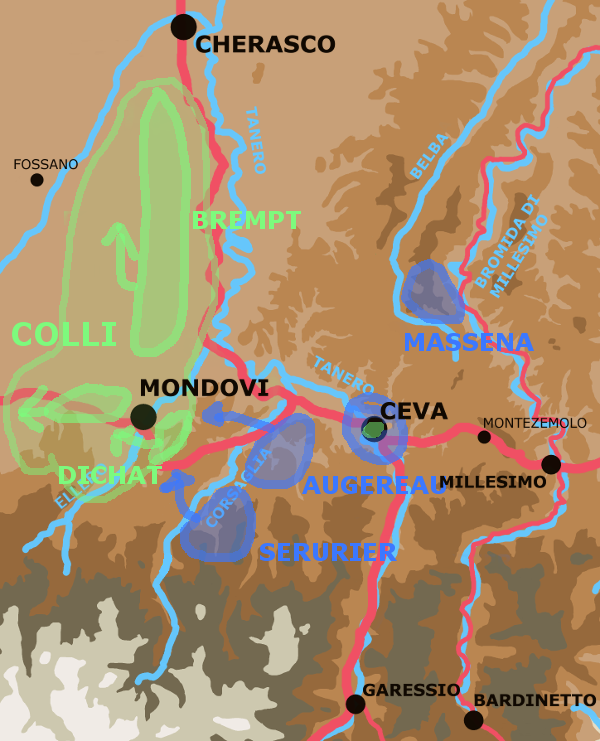
Ceva area on April 17th, Colli has retreated.
Colli is outnumbered and his troops morale poor, but the Ceva position is a strong one. Unfortunately Serurier's division coming over the Col di Navi to the south is about to flank it. During the night of the 16th/17th of April Colli slips away to take up positions along the Corsaglia river to his rear.
Colli leaves a small garrison under Tornaforte in the Ceva citadel. Tornaforte agrees not fire on the French troops passing by rendering this possession moot.
LaHarpe off map to the rear in the Montenotte to Dego area reports reconnaissance can find no sign of the Austrians.
See the battles page entry for Ceva for more details.
The French troops have crossed the Alps in just four days of battle. They are both hungry and tired.
Their supply lines are now shortened to run via the Col di Navi, and they are now in a richer country, but the improvement is not immediate.
On the 19th the French attack the Corsaglia line with some initial success on the part of Serurier, only to have his troops to begin running wild pillaging and looting. This allows the Piedmontese to launch successful counter atacks in the afternoon. In the end the French gain little at considerable cost.
The Piedmontese are themselves demoralized though. Colli has heard from Beaulieu that the Austrians now in the Alessandria area will not be coming to his aid. Fearing that if he stands in place his army may be destroyed he decides to disengage and attempt to maneuver in the Cuneo to Mondovi area.
The initial stages of the disengagment during the night of April 20th/21st go well. However, the next day the French realize the Piedmontese have retreated and immediately launch a strong pursuit. The converging columns of Serurier and Massena caught the Piedmontese in the area of Vico half way between the Corsaglia and Ellero rivers. The battle became a rout. Direct losses to the Piedmontese were moderate but their army had disintegrated. It's morale was in tatters. The remnants split in two, some moving towards Cuneo and some towards Turin via Charasco.
The French cavalry finally got to make their mark in the pursuit albeit at the cost of their commander General Stengal. Large stores of supplies were captured at Mondovi. This and levies against the rich towns of the plains meant the French troops finally began to receive rations.
See the battles page entry for Mondovi for more details.
On April 22nd the Sardinian King and his council decided to sue for peace. Their treasury was empty and their army in tatters. Bonaparte was rampaging through their richest land and threatening Turin itself.
On April 23rd Colli informs Bonaparte the Sardinians are negotiating for peace. Bonaparte continued his movements. He replied to Colli that only the Directory in Paris could make peace but he would suspend hostilities if certain conditions were met. He wanted two of the three fortresses of Cuneo, Alessandri and Tortona.
In the meantime Bonaparte continued to take Piedmontese towns. Cherasco on the 25th. Alba on the 26th.
In the wee hours of April the 28th at Bonaparte's HQ in Cherasco the Piedmontese signed the document, technically a cease fire or armistice, formalizing their surrender.
For those of you who understand some French (something this author is very poor at) the following sources referred to in Boycott-Brown will be of interest.