One of Bonaparte's rivals gleans some glory and ends the war with the Second Coalition.
The original plan was that the main French effort in 1800 would be with Moreau's Army of the Rhine deployed in Southern Germany on the direct line from Paris to Vienna.
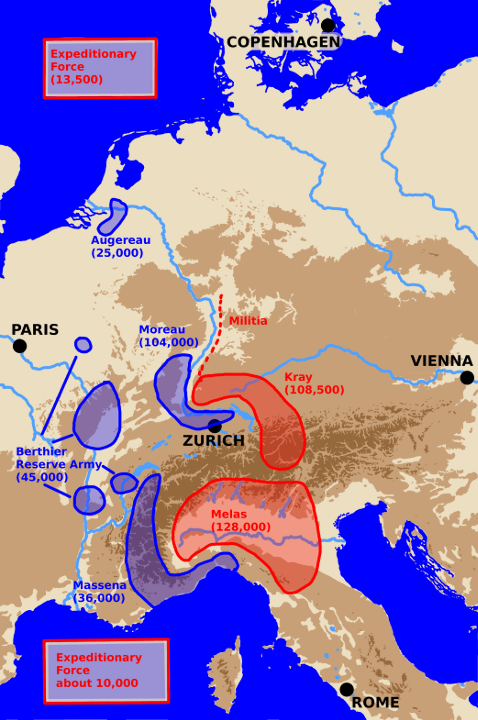
A map showing armies at the start of 1800.
For once the French army in Germany was better supplied than the opposing Austrians and their Allies from some of the smaller south German states. Well equipped and trained with experienced officers it was a formidable military machine.
First Consul Bonaparte, as usual had a bold plan, to take advantage of it. It would flank the Austrian Army's position on the Rhine by an attack on its left through Switzerland and into Germany near Lake Constance. This plan should not only defeat the Austrian Army it held real hope of destroying it.
Moreau didn't like that plan.
He had his own plan. A safer, more cautious, more complicated, more traditional, and, most of all, slower plan.
It kicked off only a little late with initial if limited success in late April. Early May saw a series of battles in the Stockach area which the French won forcing the Austrians back to the vicinity of Ulm.
The German campaign stagnated there while the better part of the Army of Italy was desperately holding on under Messena in Genoa.
By mid-May it was apparent to Bonaparte that time was running out in Italy and he launched the Army of the Reserve over the Alps in what has become known as the Marengo campaign.
It was a riskier campaign and final battle than most of Bonapartes. A desperate gamble he came close to losing. A fact he was some pains to cover up to the confusion of future historians. It saved the situation in Italy and brought a tempory peace there but not an overall peace and general victory over the Austrians. That had to be found in Germany.
While Boneparte had been busy in Italy Moreau had marked time in Germany.
Finally on June 19th just days after Marengo Moreau succeeded in flanking Kray's position around Ulm with the battle of Hochstadt.
Kray retreated. The French took most of Bavaria holding a line in front of Munich up to Ingolstadt. A truce was concluded on July 15th.
It wasn't to last. The Austrians promised the British not to conclude a separate peace before February 1801 in return for a large load and used the time to try and rebuild their shattered military.
The French on their part used the time to march Augereau's army in Holland against the princes on the Upper Rhine. Augereau secured both substantial contributions to the French war chest and Moreau's left flank by this means.
Finally after much debate on the Austrian side and chichanary on both sides the armistice ended on November 27, 1800.
December 3rd saw the battle of Hohenlinden which broke Austria's best army under the Archduke John (Erzherzog Johann).
On Christmas Day 1800 Moreau, almost to Vienna but worried about his communications, agreed to another armistice.
" On February 9, 1801 came the formal peace, the Treaty of Luneville." It honored Austria's pledge to Britain by the narrowest of margins.
The people on both sides were overjoyed at the end of years of warfare. Unfortunately their leaders would be back at it in just a few years.
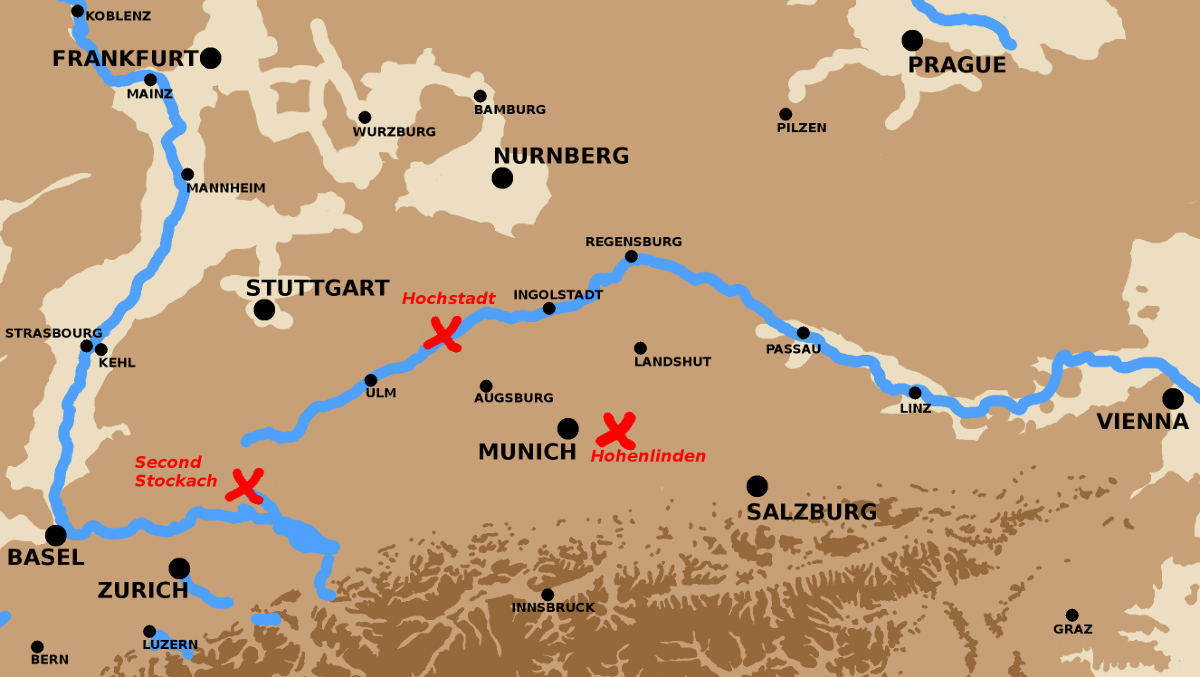
A map showing battles in Southern Germany in 1800.
The map showing the forces facing each other early in the spring of 1800 is a simplication. Blobs of color on a piece of paper or a screen don't exactly match troops on the ground by their very nature. In this case the blob showing the force Kray had directly facing Moreau is misleading. His force was dispersed into two large pieces. Under political pressure he'd dispatched 25,000 men under Hiller to guard the Tyrol. This left Kray himself with less than a hundred thousand men (Arnold gives 95,000 to Moreau's "field army" of 108,000).
Poor Austrian staff work along with much care on the part of both Moreau and Bonaparte meant that for a change the French were the better supplied and equipped of the two armies as well as being a little more numerous. Not surprisingly the French also enjoyed better morale.
Additionally the French had the advantage of an innovation in organization. They'd divided their army into all arms Corps each composed of two to three divisions. Each division was of roughly 10,000 men giving a Corps 20,000 to 30,000 men. Each division and Corps as well as having its own organic cavalry and artillery also had a permenant staff.
This permenant standardized articulated organization had been previousily experimented with by both Bonaparte and Moreau. It was an innovation they'd both had some experience with. It allowed army commanders to have better control of their troops by relieving them of the cognative burden of tracking many small tactical units grouped in an ad hoc fashion. It at the same gave the intermediate commanders the resources and means to show independant initiative. Because the units were permenant the officers, staffs, and men in them grew used to working with each other.
Moreau did deviate from what has since become the standard organization of all armies by retaining command of a Corps as well as army command.
As well as directing this organization of the Army of the Rhine Bonaparte also proposed a plan of attack designed to annihilate Kray's army prior to a march on Vienna down the Danube.
The larger part of Kray's army was desposed on the right bank of the Rhine south from Kehl to across from Basel and then east to Lake Constance. Stockach behind his left near Lake Constance was his major, rather forward, supply base. Bonaparte's idea was to flank the main force by attacking across the Rhine just below Lake Constance.
Moreau rejected Bonaparte's plan in detail but arrived at a plan of his own similar in a broad way but one that tried to be less risky. He tried to fient on the Rhine between Kehl and Basel to draw away Austrian troops. He committed fewer troops to the initial attack on Kray's left, but then marched reinforcements across the Austrian Front.
Moreau began his attack on April 25th with a feint against the Black Forest which was partially sucessful in diverting Austrian troops. "[T]his was not economy of force since 49,000 French were occupying the attention of 20,000 Austrians. Next, Moreau managed to mass close to 85,000 men near Schaffhausen"
Schaffhausen is on the Rhine just downsteam of Lake Constance. That is on Kray's far left. "Moreau now occupied the same favorable flank position that Bonaparte's strategy had been designed to gain."
Moreau crossed the Rhine. "He maneuvered so as to concentrate 20,000 men against 12,000 defenders at Stockach. They captured the Austrian base. While this action was occurring, Moreau's and Kray's main bodies locked horns in an intense battle Engen on May 3." At the end of the day "the result was a drawn battle with about 7,000 casualties on each side. Stalemate, except that Kray, learning of the fall of Stockach, feared for his communications and retreated toward the entrenched camp at Ulm."
A victory for the French that greatly improved their morale while hurting that of the Austrians.
See the Second Stockach entry on the battles page for more detail.
"Moreau pursued the retiring Austrians who again offered battle to cover Moskirch on May 5." Moskirch (or Messkirch) is just a little over 20km (12mi) NNE of Stockach or a day's regular march.
It was another hard fought, to and fro, battle that ended in the Austrians continuing their retreat to Ulm. "By day's end 5,000 Austrians and 3,000 French had fallen."
After this good start Moreau became bogged down in a game of maneuver and counter-maneuver with Kray in front of Ulm util mid-June.
As Engen is just over 20 km to the West of Stockach, and Mosskirch 20 km to the North North East and these actions all happened within a couple of days of each other they tend to be conflated as the battle of Second Stockach . To add to the confusion all three locations saw nearby actions in other campaigns. Whatever the clashes are called they ended with the Austrians being forced back on their communications through Ulm. That those communications ran down the Danube via Ulm then through Mosskirch and Stockach before reaching the Upper Rhine, remember before the railroad water transport was not just cheaper but more 'possible', is the constant feature to remember here.
On June 9th "Moreau received a dispatch from the First Consul that informed him of Bonaparte's arrival in Milan. The news that Bonaparte's campaign was progressing satisfactorily re-energized Moreau. He advanced to beat Kray at Hochstadt five days after Marengo on June 19."
See the Hochstadt entry on the battles page for more detail.
Kray retreated. As Arnold writes: Moreau "proceeded to blockade the fortresses of Ulm and Ingolstadt and managed to catch Kray's rear guard, under the command of Erzherzog Ferdinand near Landshut on July 7." Ferdinand " became trapped between converging French columns and lost all of his artillery and much else. "
The Austrians were now on the ropes in Germany too. The French occuppied a line along through Munich and up to Ingolstadt on the Danube.
" The two sides concluded a truce on July 15, modeled after Bonaparte's post-Marengo truce. From an Austrian standpoint it was an ignoble end to a bungled campaign. "
Despite the beating they'd taken, and the advice of their best general the Archduke Charles, the Austrians could not bring themselves to accept peace on the terms available essentially those of Campo Formio.
Hostilities almost broke out in September but were averted by the Austrian surrender of three fortresses left behind in the rear of French lines. These being Phlipsbourg near the Rhine and Ulm and Ingolstadt on the Danube. This removed impediments to French communications but also freed up 18,000 good Austrian troops.
Come November hostilities resumed. The French gave warning on the 12th of November and by the 26th were concentrated and ready to open operations the next day.
"Moreau's Army of the Rhine, with 107,469 men, would deliver the main stroke [...] His objective was to drive the Austrians behind the Inn River. Augereau with a 16,260 man Frano-Batavian Army would operate on his left while MacDonald, with the 18,602 man Army of the Grisons would secure his right by advancing into the Tyrol. In addition, MacDonald conduct a deversionary attack in favor of the Army of Italy."
Brune "commanded the 55,790 man Army of Italy. He too would take the offensive but had the modest objective of securing the line of the Adige River and laying seige to Peschiera, Legnago and Mantua."
First Consul Bonaparte was not planning a knock out winter campaign, but rather setting up the strategic board for victory in the spring. He remained in Paris.
In the event Moreau successfully concentrated 63,000 men around Hohenlinden ready for an advance on the Austrians Inn river line. The Austrians had "a field army of 49,000 infantry and 16,500 cavalry [...] assembled east of [the] Inn River. [...] A 15,762 man force [...] commanded by the emigre FML Conde, guarded the Inn River upstream from Branau. FML Johann Hiller protected the Tyrol while to the north, two sizeable forces defended a line from Wurzburg to Ratisbonne [Regensburg]. The entire Austrian force numbered about 124,000"
A map showing armies at the start of 1800 winter campaign.
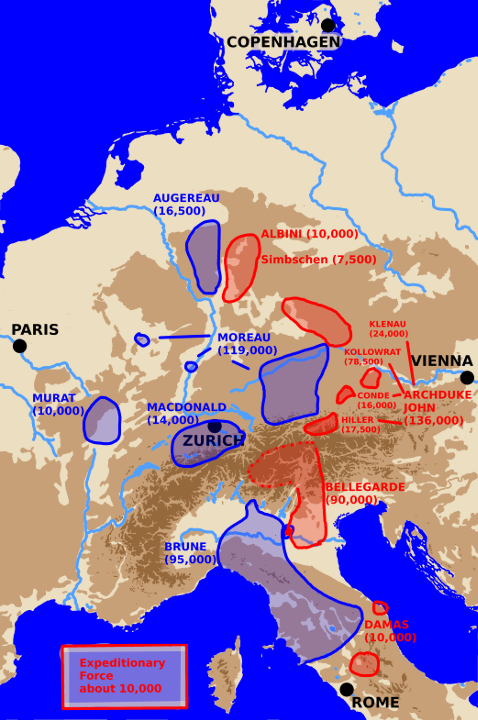
Army numbers on the map are from the West Point Atlas and so, of course, do not match those from Arnold. I'll spare you a rant on the routine unreliability of apparently hard numbers from this period.
The Austrians got the jump on the French for a change concentrating their field army at Landshut on the 25th and advancing three days later with the hope of turning Moreau's left flank.
The Autrians being unused to rapid maneuver, and with the winter weather providing plentiful chilly rain and mud, the advance did not go well. The infantry became separated from their supplies and artillery and morale was poor.
The two sides first encounter was at Ampfing on December 1st.
Two Austrian columns one under FZM Riesch and the other under FZM Baillet encountered two French divisions, those of Ney and Hardy.
The French fought hard but were forced back some five miles. "The day had cost the French 193 killed, 817 wounded, and 697 prisoners."
The "Austrian losses totaled 303 killed, 1,690 wounded, and 1,077 prisoners."
Despite heavier losses the Archduke John and the staff around him were elated by their success in pushing the French back. They decided to double down on the effort.
The Archduke expected the campaign's decisive battle on the next day, December 2nd. He expected to take place at Haag "an important road junction eight miles east of Hohenlinden. Instead, to his surprise, patrols reported at dawn that the French had withdrawn."
Encouraged by this the Archduke forged forward on the 2nd occupying Haag without a fight.
Arnold writes of his orders for the next day that "the army's orders for December 3 were more appropriate for a route march designed to concentrate the army than for a battle."
The French had reconnoitered the terrain during the fall the Austrians had not. Moreau and his subordinates were aware that the terrain was largely forested between Haag and Hohenlinden and the roads between them few and mostly poor. Moreover columns on those roads would not be easily able to communicate with or support each other.
The terrain around Hohenlinden was more open. A defender there would be able to co-ordinate his defense. Ideally the defender would catch attacking columns emerging from the forest roads before they had time to deploy and thus enjoy a tactical advantage.
The Austrian staff and commanders were not aware of these factors. They thought from their maps that their columns would be able to better support each other.
And so the scene for Hohenlinden was set. Arnold writes "When Austrian staff officers examined their maps, it appeared that only Kienmayer's column was truly separated from the balance of the army. Kienmayer was tasking with advancing from Dorfen north of Haag to Buch and then on to Hohenlinden where he would encounter Moreau's left flank. The other three columns were at most three miles from each other.
French Order of Battle at Hohenlinden:
Moreau commanding
In summary the French had: 41,990 infantry, 11,805 cavalry, and 1,935 artillery men with 99 pieces for a total of 55,730 men.
Austrian Order of Battle at Hohenlinden:
Archduke John commanding.
In summary the Allies (Austrians and Bavarians) had: 46,130 infantry, 14,131 cavalry, and 3,724 Austrian (excluding Bavarians) artillerymen and engineers for a total of 63,985 men.
The French under Moreau deployed four of their six divisions in defence of Hohenlinden, Legrand to the North south of him Bastel. Ney defended the town itself to the north east, Grouchy to the south east, and d'Hautpoul's cavalry formed the reserve. The divsions of Richepance and Decaen were miles to the south. They'd been marching on the Inn. Moreau ordered them north to flank any direct Austrian on Hohenlinden. A decision that was to make the battle the decisive one it was.
Of the four Austrian columns Kienmayer's was far to the north at Dorfen and was to march via Isen and Buch on Moreau's left flank at Hohenlinden.
The next three columns moving southwards started from the area of Haag. Balliet got assigned poor secondary roads to the north of the main highway from Haag to Hohenlinden via Schnaupping and Mittbach. Kollowrat's main center column with the Archduke got the main highway. Riesch took the southmost route through Albaching and St. Christoph. Like Balliet he was forced to use very poor secondary roads.
The Austrian march got started while it was still dark between four and five in the morning.
Kollowrat's column having the good road made good time and his advance guard came up against French troops under Grouchy at 0700, the fighting was to and fro but eventually by 0900 the French had got the better of it.
Kollowrat sat down and waited for Balliet and Reisch columns to come up. He had a long wait. Balliat had only made it to Schnaupping, half way to Hohenlinden, by 1000, Ricsch's troop on poor roads, and mired in snow and mud were making less than a mile an hour to the south.
Balliet knowing the enemy was present but uncertain of their location or even that of the other columns in his own army made numerous detachments and had rendered his force ineffective by the time it'd reached the Hohenlinden plain at Mittbach.
Riesch managed to blunder into Richepancess divisional column around 0800 and actually split it. Unfortunately for him Richepanse was a very bold general and made the key decision to continue his march on the flank of the main Austrian column leaving the rear part of his division to fend for itself.
Richepance succeeded in reaching Maitenbeth on Kollowrat's flank by 0900. By 1000 he had deployed and attacked. By 1030 determined Austrian counterattacks had failed with heavy losses.
Kienmayer to the north had enjoyed much greater sucess but after pushing back Legrand's and Bastoul's troops and establishing a position on the north end of the Hohenlinden plain had stopped to wait for the attack by the main column.
On the far south Riesch continued to push the rear half of Richpance's division under Drouet hard until Decaen's division came to its rescue about 1100.
The three southmost Austrian columns had been stopped. Not that that was necessarily clear at the time. Moreau, however, correctly read the situation and realized the lack of pressure on Grouchy from Kollowrat must mean Richepance's flank attack had gone in. He ordered Grouchy reinforced by troops from Ney to counterattack.
They crushed the head of Kollowrat's column soon linking up with Richepance. Decaen attacking Riesch pushed him back to Albaching. The Archduke himself had to flee for his life along with his demoralized men.
The three southern columns in abject retreat Moreau ordered Bastoul and Legrand's divisions to attack Kienmayer's northern column. The Kienmayer's Austrians had some difficulty extriticating themselves and retreating to Dorfen, but they managed to do so in good order and with minimal losses.
Baillet in the center seeing Kollowrat defeated retreated to Isen without direct French prompting. He reached it at 0400 am the next morning.
As Arnold writes in summary: "History shows that it is nearly impossible for converging columns to arrive on a battle front at the same time and then deliver a coordinated assault. The sad fate of the Austrian army at Hohenlinden is one more contribution to this record."
"The Austrians lost 798 killed, 3,697 wounded while yeilding at least 7,195 prisoners, 50 artillery pieces and 85 caissons."
"The Bavarians [Austrian allies] suffered 24 killed, and 90 wounded while yeilding 1,754 prisoners, 26 artillery pieces, and 36 caissons. "
So Hohenlinden lost the Austrians and their allies roughly 13,500 men and 76 artillery pieces while the French probably suffered losses of 3,000 men and one artillery piece. A lope sided victory for Moreau even by Napoleonic standards.
See the Hohenlinden entry on the battles page for more detail.
In a few weeks Moreau would be close to Vienna and on Christmas Day a truce was called that led to the peace of Luneville in February.
Moreau's campaign in Germany hadn't been as daring or striking as some of Bonaparte's but it had been competantly carried out.
In the end Moreau achieved a decisive war ending victory.
Arguably he did so at a cost less than that Bonaparte habitually paid.
In any event Moreau's victory made him very popular and a political problem for Bonaparte even while it secured Bonaparte position at the head of the French government.
Note: You will need to cut and paste addresses given into your browser's address line in order to follow them.